

In the age of short attention spans and content-rich digital experiences, a static slide presentation can feel, well, a little boring. You’ve worked hard on your research and crafted your points, but without that extra spark, your audience might not be as captivated as they could be. This is where video comes in.
Videos can transform a mundane slideshow into a dynamic, engaging, and memorable experience. They have the power to illustrate complex concepts, break up long blocks of text, and bring your narrative to life in a way that static images and words simply can’t.
Perhaps you’ve dealt with a video that wouldn’t play or a presentation file that became too large to email. If so, you already know that adding video isn’t always straightforward. That’s why we’ve put together this complete guide. We’ll walk you through the 2 primary methods for adding videos to PowerPoint and cover all the essential settings you need to master. We’ll also give you practical solutions for the most common troubleshooting issues.By the end of this article, you’ll be a pro at integrating video seamlessly into your presentations.
For this guide, we utilized the Office 365 version of PowerPoint. The template featured is available for free download on Mslides.

Method 1: Inserting a Video from Your Computer (The Offline Method)
This is the most common and reliable way to add a video, especially if you won’t have an internet connection during your presentation. It embeds the video file directly into your PowerPoint presentation, ensuring it will play exactly as you expect, regardless of where or when you present.
Step-by-Step Instructions
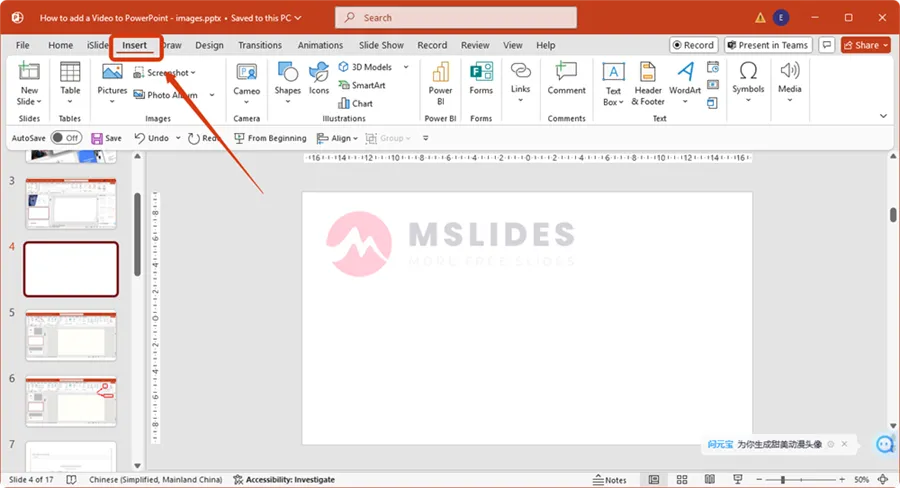
Step 01: Open your PowerPoint presentation and navigate to the slide where you want to insert the video.
Step 02: Go to the “Insert” tab on the ribbon at the top of the screen.
Step 03: In the “Media” group on the far right, click the “Video” dropdown arrow. Select “This Device…” (or “Video on My PC…” depending on your PowerPoint version).
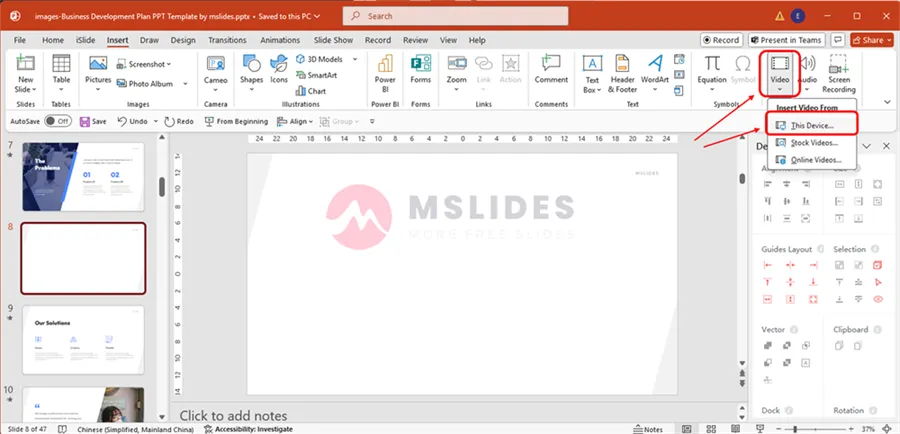
Step 04: A file explorer window will open. Navigate to the location on your computer where the video file is stored, select it, and click “Insert.“

The video will now appear on your slide. You can click and drag it to reposition it, or use the corner handles to resize it.
Pros and Cons of This Method
Pros:
- Reliable Playback: Since the video is embedded in the file, you don’t need an internet connection. This is the most significant advantage, making it the preferred method for crucial presentations where network access is uncertain.
- No Dependency: The video is self-contained within your presentation file, so you don’t have to worry about the source video being moved or deleted from an online platform.
- Full Control: You have complete control over the video’s quality and format. You can pre-process and optimize the file before inserting it for the best results.
Cons:
- Increased File Size: Embedding a video file can dramatically increase the size of your PowerPoint presentation. This can make it difficult to email, upload to a cloud service, or store on a flash drive with limited space.
- Compatibility Issues: While rare with modern formats, older video formats might not be compatible with the version of PowerPoint on the computer you’re using to present. Sticking to a widely supported format like MP4 is highly recommended to avoid this.
Method 2: Inserting an Online Video (The Cloud-Based Method)
If your presentation will be delivered in an environment with a strong, stable internet connection, inserting a video from an online source is an excellent alternative. This method essentially links to the video rather than embedding it, keeping your presentation file size small.
Step-by-Step Instructions
Step 01: Open your presentation and go to the slide where you want to add the video. Go to the “Insert” tab on the ribbon.
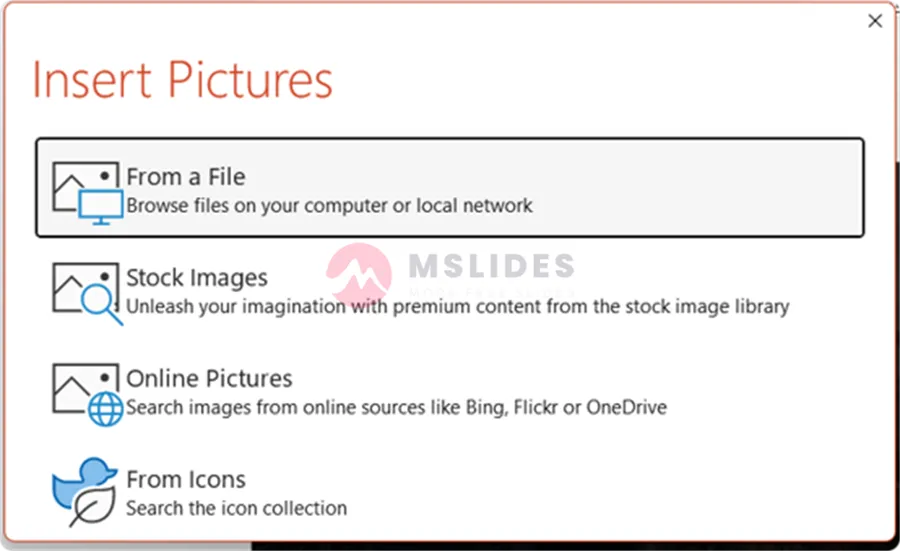
Step 02: In the “Media” group, click the “Video” dropdown arrow. Select “Online Videos…”
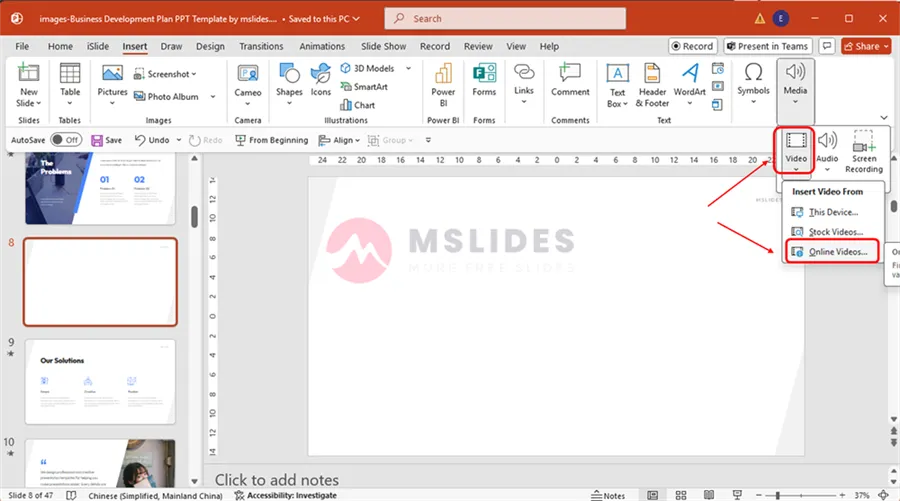
Step 03: A dialog box will appear. You will need to find the share or embed URL of the video you want to use. In Microsoft 365, PowerPoint only supports inserting online videos from three platforms: YouTube, Vimeo, and Slideshare.Most platforms like YouTube have a “Share” button that provides this link.
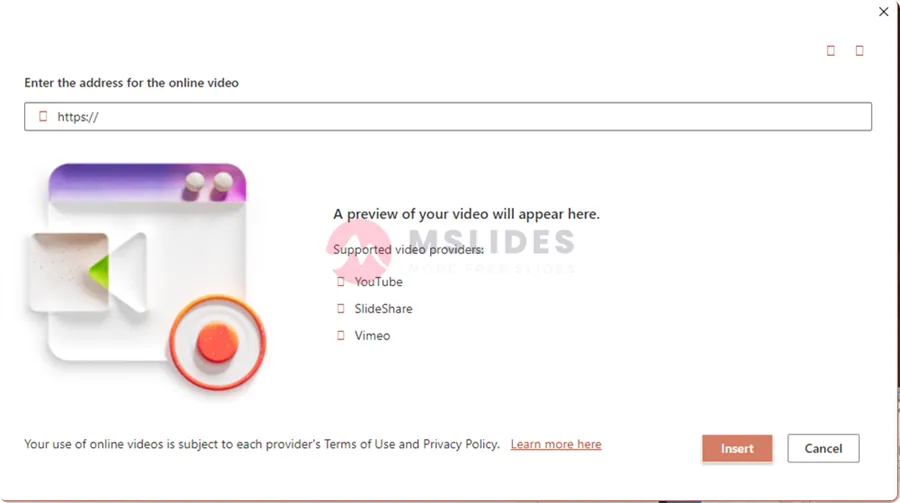
Paste the video’s URL into the text box and click “Insert.“
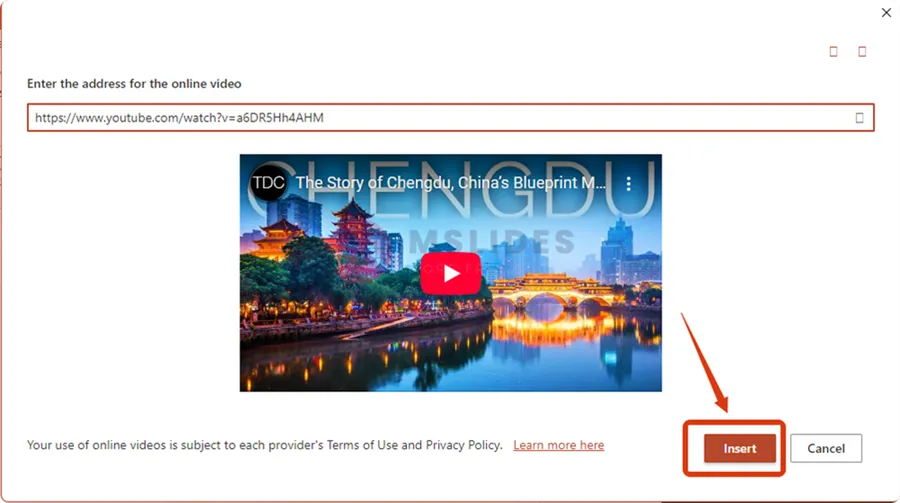
A thumbnail image of the video will now appear on your slide. Again, you can resize and reposition it as you like.
Related Post: How to Add a YouTube Video to PowerPoint? The Ultimate Guide for 2025
Pros and Cons of This Method
Pros:
- Quick and Easy: It’s incredibly fast to add content from popular video-sharing sites without a lengthy download process.
- Updated Content: If the original online video is updated, your link will automatically reflect those changes.
Cons:
- Requires Internet Access: This is the most significant limitation. If you lose your internet connection or the Wi-Fi is slow, the video will not play or will be choppy and unprofessional.
- Dependency on External Sites: If the original video is taken down, made private, or its URL changes, the link in your presentation will break.
Advanced Video Settings to Master
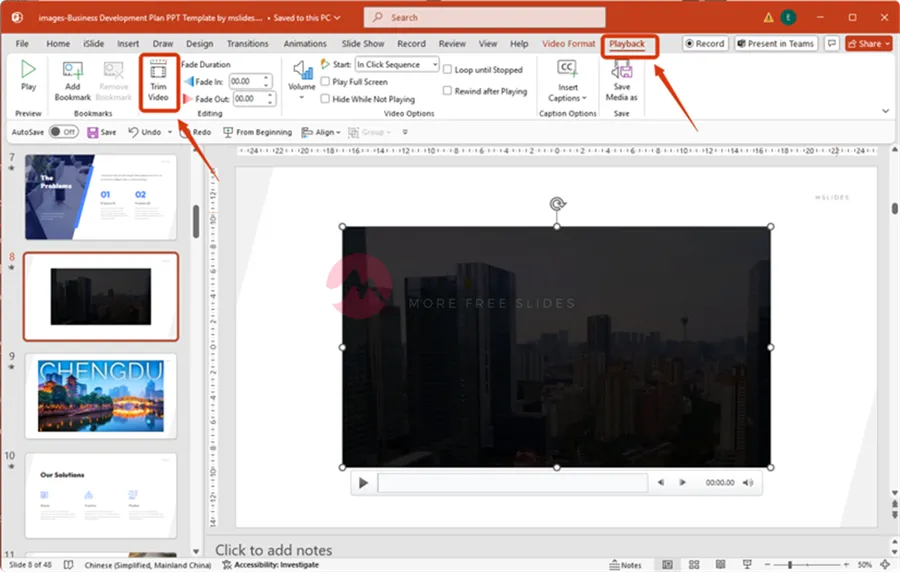
Once the video is on your slide, you have a wealth of options to control its appearance and playback. Access these settings by clicking on the video and then navigating to the “Playback” tab that appears on the ribbon.
Playback Options: In Click Sequence vs. Automatically
By default, PowerPoint sets videos to play “In Click Sequence,” meaning you have to click the video to start it. This is great for deliberate control, but sometimes you want a video to start on its own.
On the “Playback” tab, look for the “Start” dropdown menu.

- Choose “Automatically” if you want the video to begin playing as soon as you land on the slide.
- Choose “In Click Sequence” if you want the video to start only after you click on it.
Trimming Your Video
You don’t always need to show an entire video. Maybe you only want a short, impactful clip from the middle of a longer video.
Select the video on your slide.
On the “Playback” tab, click “Trim Video.“
A dialog box will open with a timeline. Use the green start marker and the red end marker to define the segment of the video you want to keep.
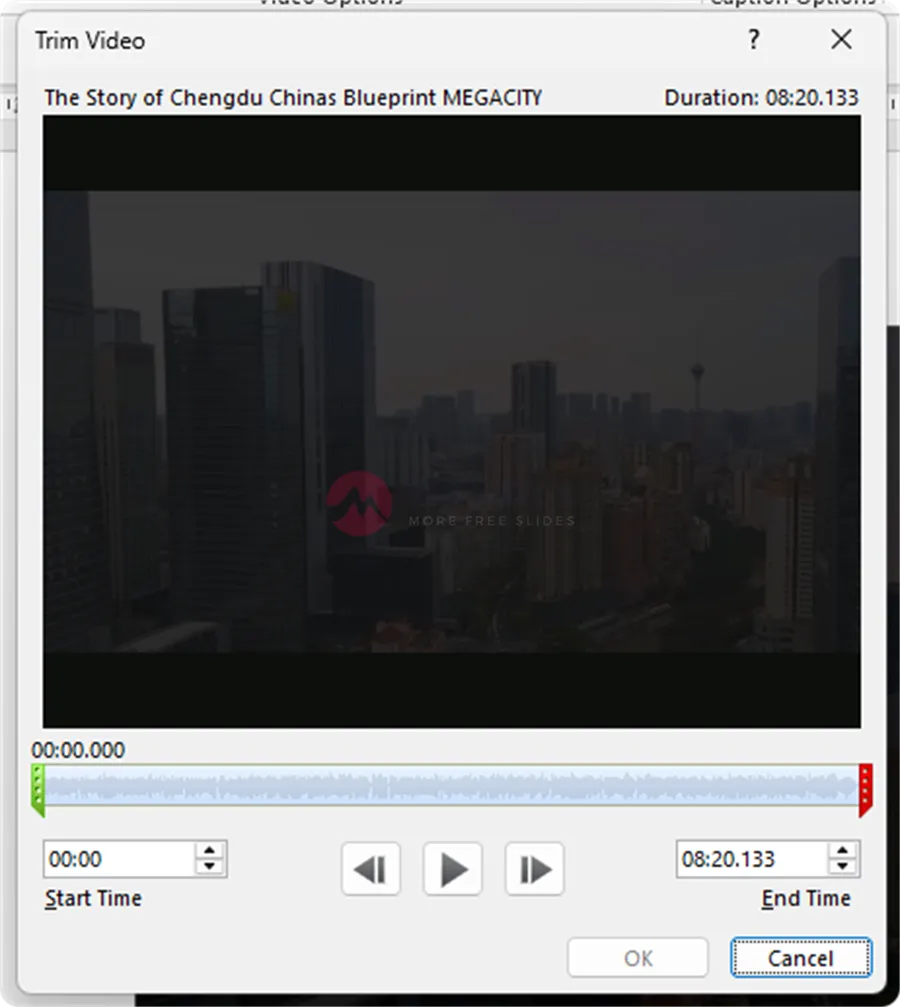
Click “OK” to save your changes.
This is a non-destructive edit, meaning the original video file on your computer remains unchanged.
Please note that you can only trim videos that are inserted from your computer (local files); you cannot perform trimming on online videos.
Looping and Rewinding
If you’re using a short video as background ambiance or for a product demonstration, you might want it to play continuously.
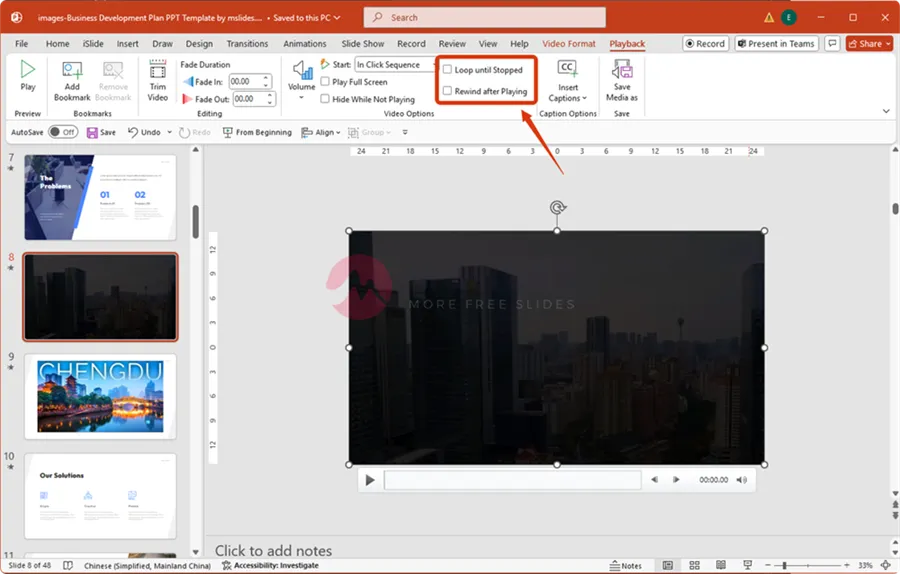
On the “Playback” tab, check the “Loop until Stopped” box to make the video repeat endlessly.
The “Rewind after Playing” option is also helpful if you want the video to reset to its beginning frame after it finishes, ready for another play later in the presentation.
Compressing Your Video
This is a critical step for managing file size, especially if you’re using the offline method.
Choose the video you want to compress.

Go to the “File” menu, then select “Info.“
Click the “Compress Media” button.

A dialog box will give you three compression options:
- Full HD (1080P): Provides the best quality but the smallest compression.
- HD (720P): A good balance of quality and file size.
- Standard (480P): Reduces file size the most but significantly lowers the video quality.
Choose the option that best fits your needs. PowerPoint will then work to compress all the videos in your presentation.
Adding a Poster Frame
When a video isn’t playing, it usually defaults to a black screen or a snapshot of the first frame. You can customize this by setting a specific “poster frame” (a custom thumbnail image).
Select your video.

On the “Video Format” tab, click the “Poster Frame” dropdown.
Choose “Image from File…” and click “From a File”. And then, select an image from your computer to use as the thumbnail. This is great for brand consistency and a more polished look.
Troubleshooting Common Video Problems
Sometimes, even after following the steps, things don’t go as planned. Here are some of the most common issues and their solutions.
Problem 1: Video Playback is Choppy or Lagging
Why it happens: A video may be too large, have a high bit rate, or be in a format that your computer struggles to decode.
Solutions:
- Compress the Video: Use the built-in compression tool we discussed earlier. This is your first and best option.
- Convert the Format: If your video isn’t already an MP4, convert it. MP4 is the most universally compatible and efficient video format. You can use free online converters or video editing software.
- Check Computer Performance: Close other demanding applications running in the background. If you’re on a very old or underpowered computer, it may simply not have the processing power to play high-resolution video smoothly.
Problem 2: The Video Plays, But It’s a Black Screen
Why it happens: This is usually a codec issue. A codec is a piece of software used to compress or decompress a digital media file. If your computer doesn’t have the necessary codec for the video, it can’t play it.
Solution: The easiest fix is to convert your video to a widely supported format like MP4 using the H.264 codec. If you’re still experiencing issues, ensure your version of PowerPoint and your operating system are up to date.
Conclusion
Mastering the art of adding videos to PowerPoint is a game-changer for anyone who presents, whether you’re a student, a sales professional, or a public speaker. By understanding the differences between inserting a local video and an online one, and by taking a few extra moments to optimize playback settings, you can ensure your presentation is professional, polished, and unforgettable.
Now that you have the knowledge, it’s time to put it into practice. Go ahead and try adding a video to your next presentation. You might be surprised at the difference it makes.
If you have any questions or your own tips for using videos in PowerPoint, feel free to share them in the comments below!
FAQs
Q: What is the key advantage of using the “Insert from This Device” method (Offline Method)?
A: The main benefit is reliable playback. Since the video file is embedded directly into the presentation, you do not require an active internet connection, making it the preferred method for crucial or remote presentations.
Q: What is the biggest limitation of inserting a video using the “Online Videos” method?
A: The biggest limitation is the dependency on internet access. If your Wi-Fi connection is slow or drops during the presentation, the video will not play, or it will be choppy and unprofessional.
Q: How can I make my video start playing automatically when I open the slide?
A: Select the video on the slide, navigate to the “Playback” tab on the ribbon, and change the “Start” setting from “In Click Sequence” to “Automatically.“
Q: Can I reduce the size of my PowerPoint file after I’ve embedded a large video?
A: Yes. Go to the “File” menu, select “Info,” and then use the “Compress Media” button. This feature allows you to reduce the video file size directly within PowerPoint to improve sharing and storage.
Q: What video format is most highly recommended for maximum compatibility and efficiency in PowerPoint?
A: It is highly recommended to use the MP4 format, ideally encoded with the H.264 codec, as it offers the best balance of quality, compression, and universal compatibility.
Q: Is it possible to show only a small segment of a longer video?
A: Yes. Use the “Trim Video” feature, which is located under the “Playback” tab. You can use the start (green) and end (red) markers to select the precise segment of the video you wish to include.
Q: Why is my video playing but only showing a black screen?
A: This is usually a codec issue, meaning your computer lacks the necessary software to properly decode the video file. The easiest solution is to convert your video to the widely supported MP4 (H.264) format.
Q: How do I make a short background video continuously repeat during a slide?
A: Select the video, go to the “Playback” tab, and check the box labeled “Loop until Stopped.“
Q: Can I change the default black frame that appears before my video starts playing?
A: Yes, you can customize this by setting a “Poster Frame.” Select the video, navigate to the “Playback” tab, click “Poster Frame,” and then choose an image from your computer to use as the custom thumbnail.