


Pictures are very critical for presentations. You always need to add some pictures to your presentations. Whether it’s a business report or a personal resume. Good pictures can make your presentations more compelling. And they will help you to convey important messages effectively. We need to know how to find good pictures for presentations. It’s also important to know how to insert pictures in PowerPoint.
This tutorial details four methods to insert pictures into your presentations in PowerPoint. You can use them to solve various problems about inserting pictures in PowerPoint.
Because there are so many skills about how to insert pictures in PowerPoint. This guide covers quite a lot of ground! It’s a long read, so feel free to use the table of contents below to jump around.
4 Ways to insert pictures in PowerPoint
Overall, there are four methods to insert pictures in PowerPoint:
- Insert pictures directly
- Fill a shape with a picture
- Merge a picture with a shape
- Insert a picture into a picture placeholder
All these methods have their advantages and disadvantages. I will give you some useful suggestions for using them. I’m sure you’ll have complete control over how to insert pictures in PowerPoint.
Note: The software used in this article is PowerPoint in Microsoft 365. The template used in this article comes from Mslides and you can download it for free.
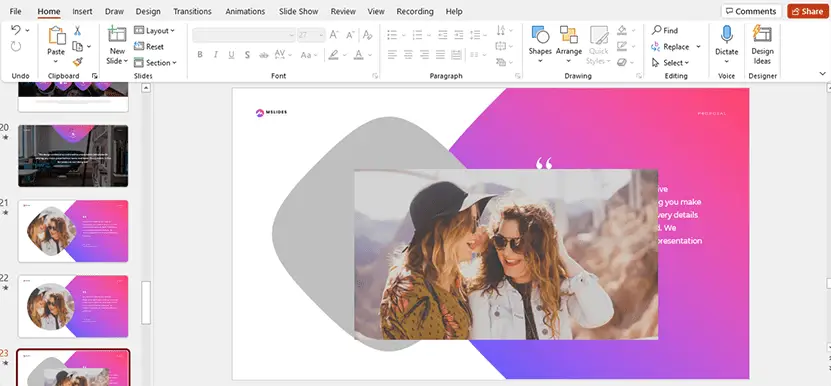
We’ll cover these four methods by making a page from this template. You should note that the shape of the picture on this page is not standard in PowerPoint. It’s a Freeform shape generated through an online tool called Squircley.

let’s get started!
Insert pictures in PowerPoint directly
It’s very easy to insert pictures in PowerPoint. After inserting, you can change your pictures to various shapes.
You can follow these steps to insert a picture into your presentation:
Step 01. Insert a picture
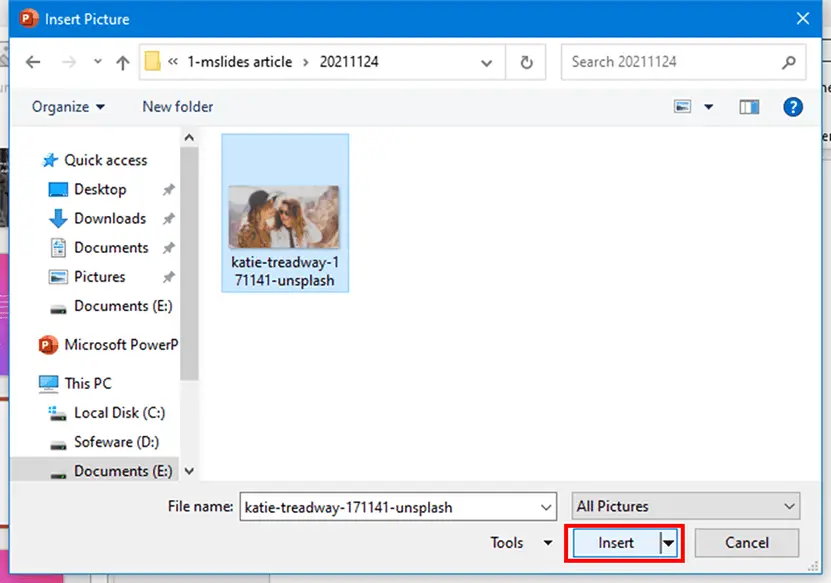
Click Insert, and then click Pictures -> this device, and select the picture you need to insert. You can also drag your pictures directly from the folder to the slide.

Select the picture you need to insert, and then click Insert.
Step 02. Crop the picture
After we insert a picture, we need to crop the picture generally.
Click on the picture you want to crop to select it. And then click the Picture Option tab in the ribbon. You can find the Crop option.
This option includes the upper and lower sections.
By clicking the icon in the upper section, you can quickly crop the picture. By clicking the text in the lower section you can open more cropping options.

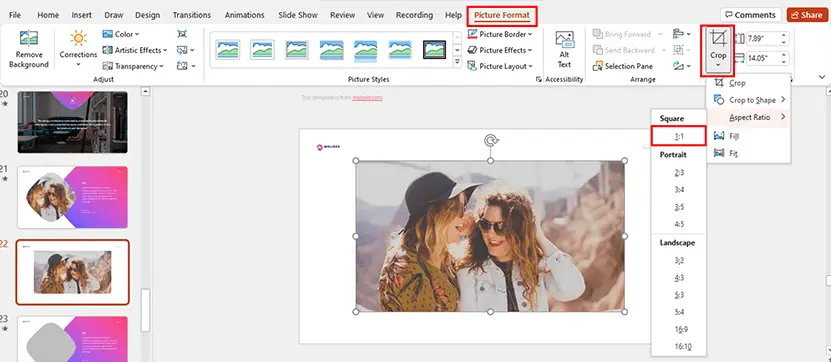
For the example slide, we need to crop the picture to a shape. But the shape used in this slide is a Freeform shape. And we can’t crop pictures to Freeform shapes in PowerPoint. So, we have cropped this picture into a circle instead.
Please Note: When you crop a picture to a shape in PowerPoint, the shape will be stretched by the aspect ratio of the picture. So we need to crop the picture to 1:1 first before we crop it to a circle.
How to crop the picture to a circle?
Select the picture and a tab called Picture Format will appear in PowerPoint. After clicking on it, you’ll see many options for customizing pictures.
You’ll find an option named crop and by clicking on the icon you can crop the picture. You need to click the arrow below this icon to open more crop options. And then click aspect ratio -> 1:1. And then click in the blank space on this slide. Now, you have cropped this picture to a square.
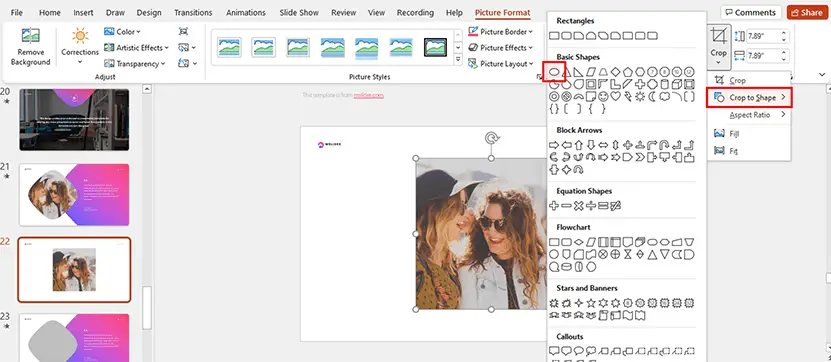
Then click the arrow below the crop option again, and then click the Crop to shape -> Oval. And you’ll crop this picture into a circle.
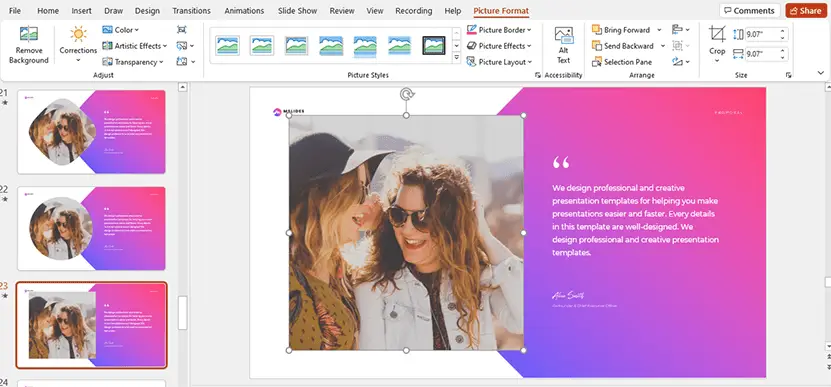
Step 03. Resize and position the picture
After you crop the picture to a circle, You need to resize and position the picture. But please note that You should not change the respective ratio of the picture.
In PowerPoint, you can resize the picture by dragging the points on the four corners of the picture. You will not change the aspect ratio of the picture.
The slide after inserting a picture.

It’s very easy to insert a picture directly into a presentation in PowerPoint. But it’s not easy to change the picture to another shape after inserting it. So we do not recommend you use this method to insert a picture in PowerPoint.
In practice, we rarely insert pictures directly into a slide. We usually use a shape Instead of a picture when we need to use a picture. We can insert pictures after completing our presentations.
For many Freeform shapes, such as the brush shape on the following slide. We can’t insert the picture by using this method.

Advantages:
- It’s very easy to operate.
Disadvantages:
- It’s not easy to crop pictures to shapes.
- You can’t crop pictures to freeform shapes.
- You can’t change pictures quickly.
Fill a shape with a picture
In PowerPoint, besides inserting a picture directly, you can also insert a picture by filling a shape with a picture.
You can follow these steps:
Step 01. Use a shape to replace a picture
For the sample slide, we used a gray shape to replace the picture.

Step 02. Fill the shape with a picture
If the picture’s aspect ratio is the same as the shape’s aspect ratio. You can insert the picture directly into the shape. Otherwise, the picture will be stretched. It will be strange and unaesthetic.
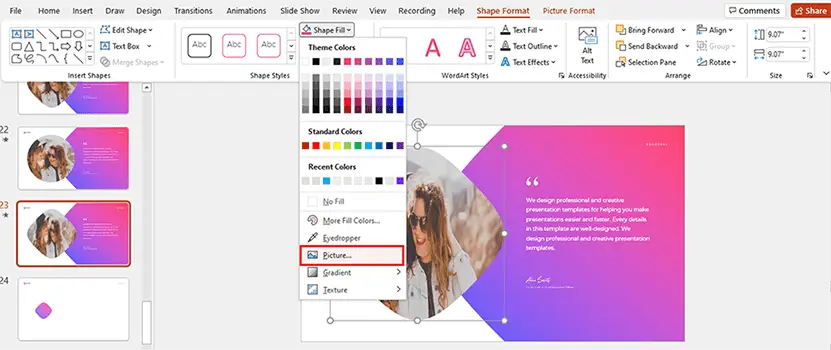
Click the Shape Format tab. And then click Shape Fill > Picture. Choose the picture you want to insert.
If the aspect ratio of the picture is different from the aspect ratio of the shape. You should ship this step and crop the picture first.
In practice, their aspect ratios are always different. So we need to crop the picture first before inserting a picture into a shape.
Step 03. Crop the picture
For the example slide, you can’t fill the picture directly into the shape. You need to crop the picture before inserting it into the shape. Then, insert the cropped picture into the shape.
Firstly, you need to insert the picture into the slide. Click Insert > Pictures > This device. Select the picture you want to insert. Or you can drag the picture directly from your folders to the slide.
Secondly, we need to crop the picture.
If you know the aspect ratio of your shapes exactly, you can crop your shapes by aspect ratio. For example, we know the aspect ratio of the shape in our sample slide is 1:1. So we can crop the picture by aspect ratio.
But, for most shapes, we don’t know their aspect ratio. Such as the brush shape mentioned in the previous section
How do crop pictures for these shapes?
You can use the align command to align the picture with the shape. And then drag the corners of the picture so that the picture is consistent with the height or width of the shape. Then you need to adjust the position and crop the picture.
Step 04. Open the Format Shape task pane
After cropping, you need to move the picture to the blank space on this slide.
Click on the shape you want to fill to select it. Click the Shape Format tab. And then click the arrow in the lower right corner of the Sharp Styles Section to open the Format Shape task pane.
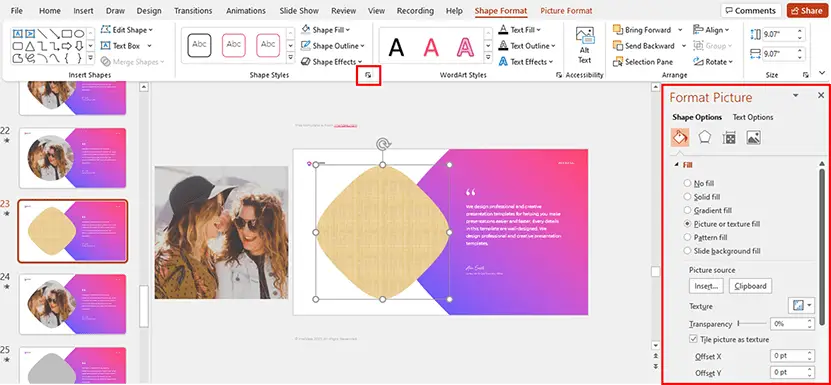
Step 05. Fill the shape with the cropped picture
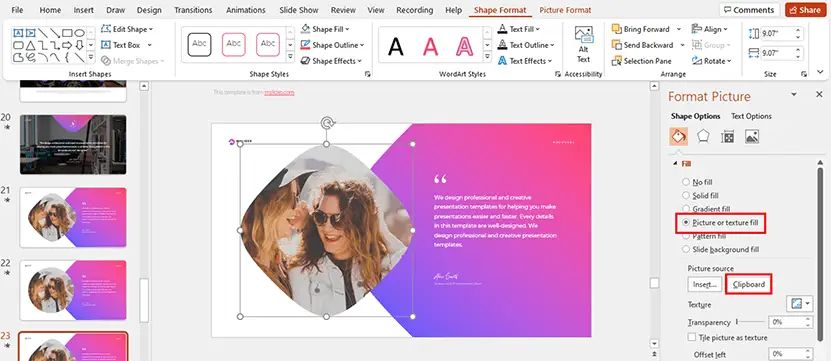
Click Fill. Select Picture or texture fill.
Look at the Picture source section. You can either insert a picture or choose the Clipboard.
You need to choose the clipboard. Click on the cropped image, and then Press Ctrl + C to copy the picture. Or you can Press Ctrl + X to cut the picture. Then select the shape, and click Clipboard.
Now, the picture is successfully filled into shape.
Click on the picture and you’ll see two related tabs in the ribbon: the Shape Format tab, and the Picture Format tab. That means the picture is still a shape.
Advantages:
- It’s suitable for making almost all kinds of pictures.
- You can also fill a picture into a group of shapes.
- It’s easy to replace pictures;
- If you add animations to a picture, the animations will not disappear after you replace the picture
Disadvantage:
- The operation is complicated.
- You can’t adjust the picture again after inserting it into a shape.
Merge a picture with a shape
This method is very like the previous one. First, you should replace the picture with a shape. Then, insert the picture into the slide.
You can follow these steps:
Step 01. Resize and position the picture
Drag the four corners of the picture to resize the picture. When you resize the picture, the picture becomes transparent. You can observe the part of the picture that intersects the shape.

After you resize the picture, you should send the picture back. Right-click on the image and click the “send to back” option in the pop-up menu.
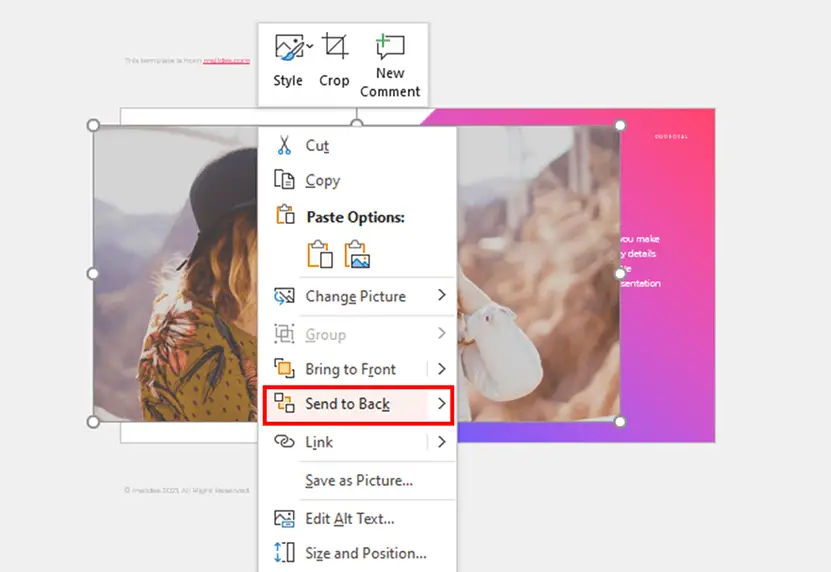
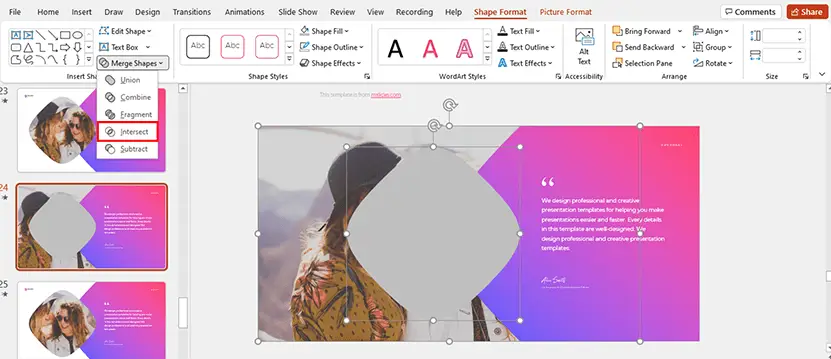
Step 02. Merge the picture with the shape
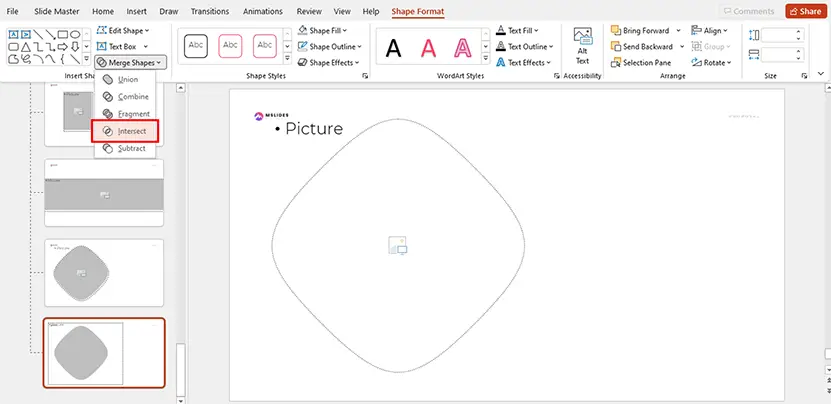
Press and hold the Ctrl key. Click the image. And then click the shape.
Please note: You must click the picture first, and then click the shape.
Click on the Shape Format tab, and then click Merge Shapes > intersect.
Step 03. Bring the picture to the front

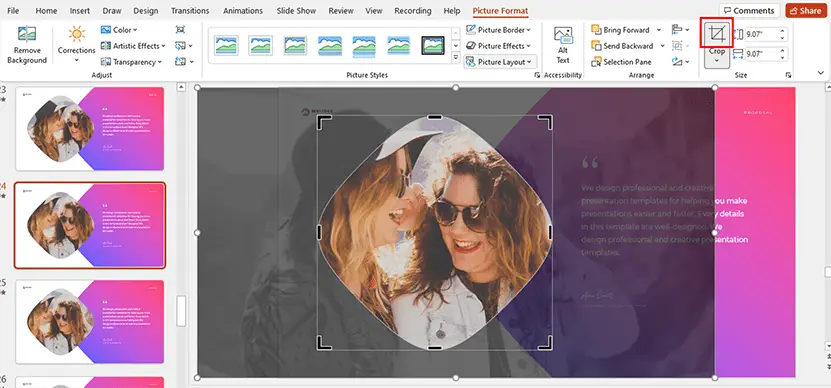
Step 04. Adjust or replace the picture
After you merge the picture with the shape, the cropped part of the picture isn’t deleted. So if you’re not satisfied with the picture, you can still adjust the picture.
Select the image you want to adjust. Click the Crop icon in the Picture Format tab. You’ll see the hidden part of the picture. You can resize and position the picture.
If you need to replace the picture, you should insert the new picture into the slide. And then resize and position the new picture. Merge the new picture with the previous one.
Now, we have completed the insertion of the picture. After clicking on the image, you’ll find that only the Picture Format tab appears. This means that we have turned the previous shape into a picture.
Advantages:
- The operation is simple.
- The cropped portion of the picture can be preserved and adjusted again
- It’s very easy to change pictures.
Disadvantages:
- After you replace a picture, the animations you add to the picture will disappear.
Insert a picture into a picture placeholder
As in the previous two methods, we use a shape to replace the picture first. And then we’ll convert the shape to a picture placeholder.
We can insert a picture into a picture placeholder.
You can follow these steps:
Step 01. Cut the shape to the clipboard
Select the shape and press Ctrl + X to cut it to the clipboard.
Step 02. Open the Master View
Click View > Slide Master to open the Master View.

Step 03. Insert a layout
After you click the Slide Master, you’ll open the Slide Master view. A new tab called Slide Master will appear in front of the Home tab. After entering the Master View, click Insert Layout to create a new layout.

Step 04. Paste the shape into the layout

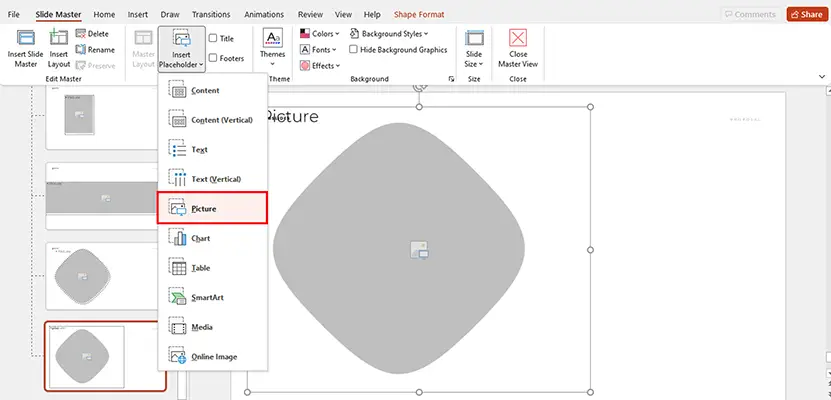
Step 05. Insert a picture placeholder
Click Insert placeholder > Picture. And then drag the mouse to create a picture placeholder.
Please note that the picture placeholder must completely cover the shape.
Step 06. Merge the picture placeholder with the shape
Press and hold the Ctrl key, click the image placeholder, and then click the shape.
Please note that you must choose the picture placeholder first to get a new picture placeholder.
Click on the Shape Format tab above. And then click Merge Shapes > Intersect.
Now, you have already converted the previous shape to a picture placeholder. To make it easier to recognize, you can fill the picture placeholder with colors. I always fill image placeholders with gray.
Step 07. Apply the layout
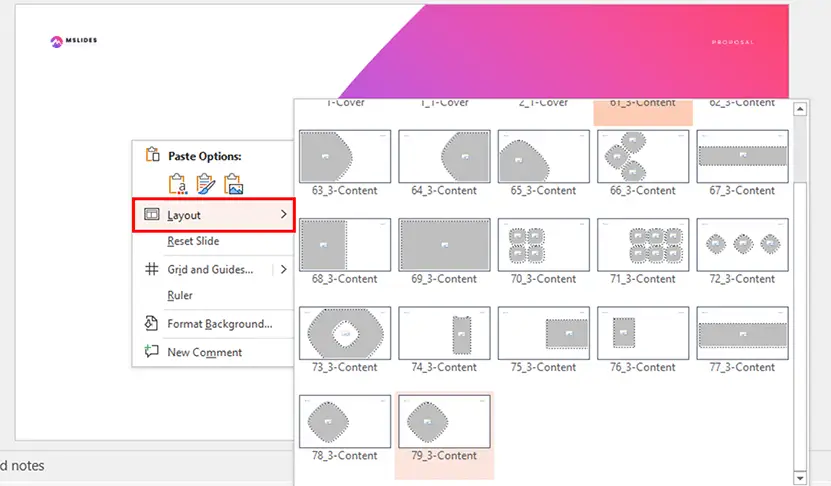
Click the Slide Master tab, and then click the Close Master View button.

Right-click in the blank space of the page, then click Layout and you’ll see all the layouts in your presentation, select the layout you just created.
The picture placeholder will automatically appear on this slide.
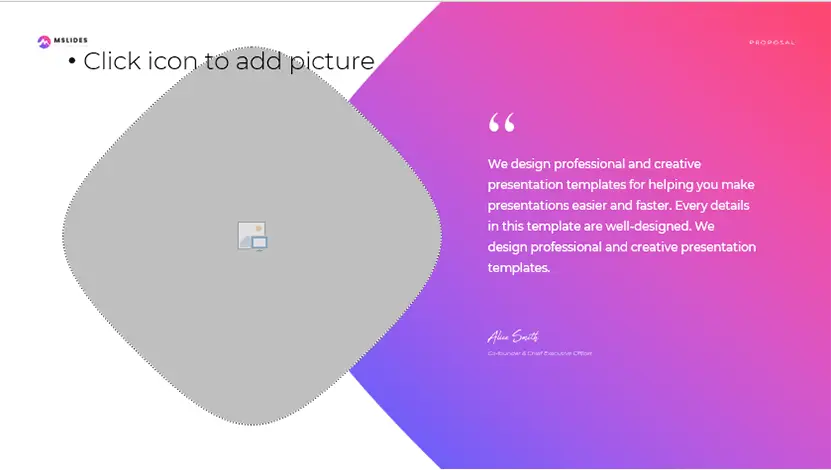
Step 08. Insert a picture
You can click the icon in the picture placeholder and select your picture, or you can drag the picture directly from your folder into the slide, and the picture will be automatically cropped and populated with the picture placeholder.

Step 09. Adjust the picture
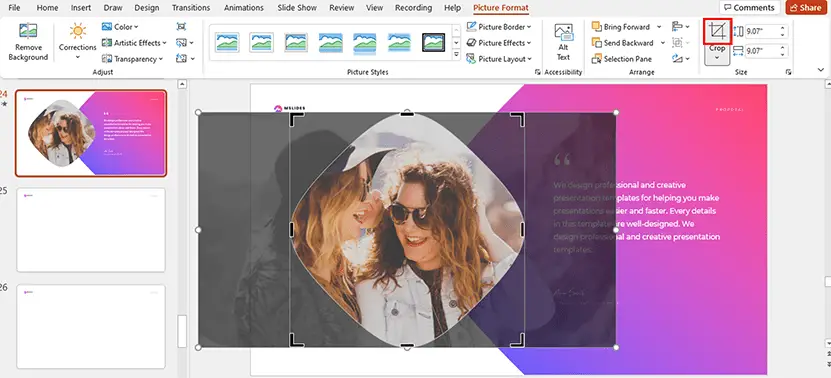
When you insert a picture into a picture placeholder. PowerPoint will crop the picture automatically. If you’re not satisfied with the result, you need to adjust the picture.
Click on the picture. And then click Crop, and you’ll see the cropped part of the picture. You can resize and position the picture again.
How to change the picture to a new one?
It’s very easy. You can click on the picture, then press the Delete key to delete it. After you delete it, the picture placeholder reappears, and you can add a new picture again.
Tip: If you want to add some animations to the picture placeholder, you’d better add them in the Slide Master view. So that the animations will not disappear when you add, adjust, and replace the picture.
Advantages:
- It’s very easy to modify and replace pictures.
- You can use this method to create almost all kinds of pictures.
- Animations created in the Slide Master view will not disappear when you add, adjust, and replace the picture.
- Picture placeholders can be used on multiple slides.
Disadvantages:
- It’s complicated to create picture placeholders.
This method has so many advantages. So many professional designers are using it.
To make it easier for our users to insert pictures, all templates published on Mslides include picture placeholders.
Conclusion
In this tutorial, we have detailed four methods to insert pictures in PowerPoint. They all have some advantages and disadvantages.
According to our experience, it is not recommended to use the first method. When you make a presentation, you can use a shape instead of a picture when you need to insert a picture into a slide. Even if we already know exactly which picture we want to use.
You can add pictures after we finish our presentation. When you add a picture to a slide, you can fill a shape with a picture, merge a picture with a shape, or convert a shape to a picture placeholder.
If you download a template from our website, you’ll find out that all templates contain picture placeholders, you just need to drag your pictures into them. You can also download more free PowerPoint templates and Google Slides themes on our website.
Have any questions? Feel free to leave a comment!