


PowerPoint is a powerful tool for creating visual presentations. One of the most used features in PowerPoint is the ability to insert pictures onto a slide. In some cases, you may want to crop a picture into a circle shape to create a more polished and professional-looking presentation. In this blog post, we will introduce 4 methods to crop a picture into a circle in PowerPoint.
The template used in this post is designed by Mslides. You can download it for free.
Method 1: Crop a Picture into a Circle in PowerPoint
Step 1: Insert the Picture
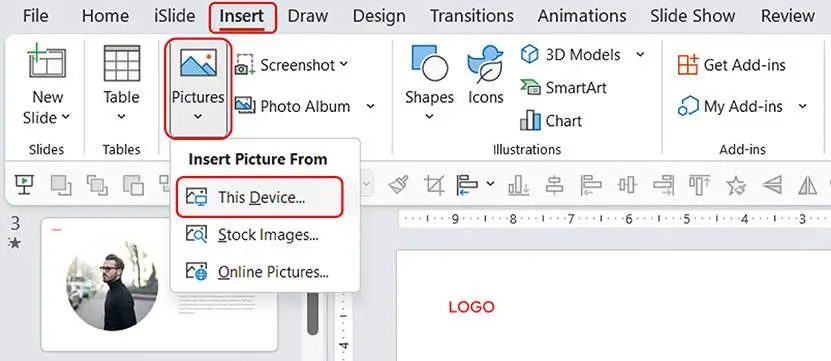
Insert the picture you want to crop into your PowerPoint slide by clicking on the “Insert” tab in the ribbon and selecting “Pictures“.
Step 2: Select the Picture
Select the picture by clicking on it. You will see a border appear around the picture to indicate that it is selected.
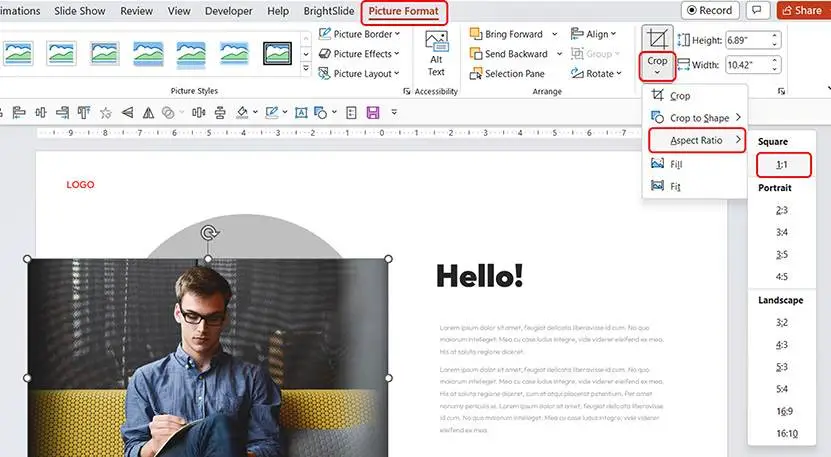
Step 3: Crop the Picture into a square shape.
When you select the picture, the “Picture Format” tab will appear. Click on this tab, and then click the down arrow under the “Corp” option. Then, you should click “Aspect Ratio” and the option “1:1”. The picture will now be cropped into a square shape.
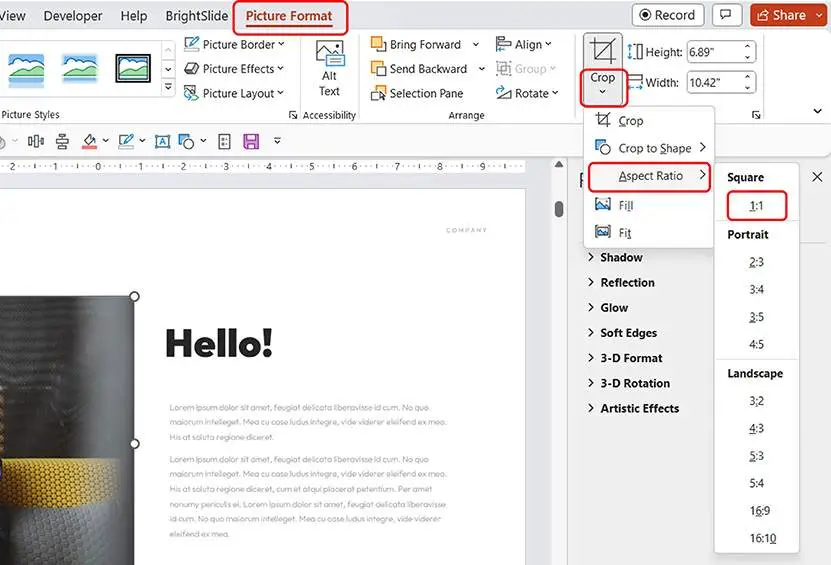
Please note that you always need to crop the picture to a square before cropping it into a circle. But if your picture is square, you can ignore this step.
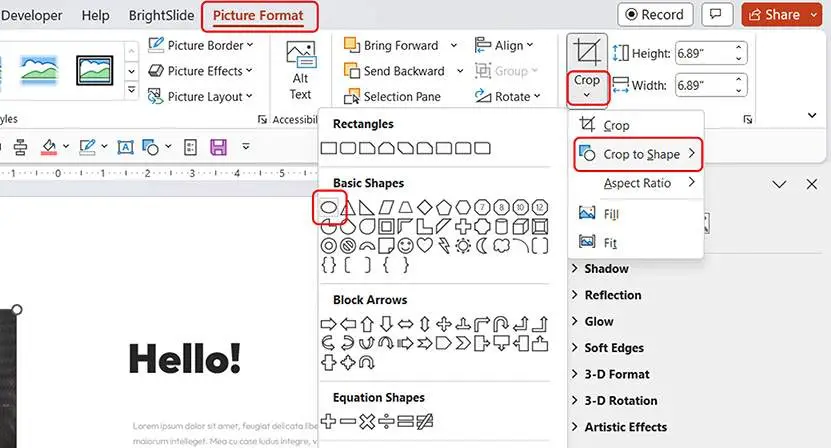
Step 4: Crop the Picture into a circle.
Select the picture and click the down arrow under the “Corp” option again. Then, you should click “Crop to shape” and choose the oval shape. The picture will now be cropped into a circle shape.
Step 5: Adjust the size and position of this picture.

Step 6: Save your presentation.
You can use the shortcut Ctrl + S to quickly save your presentation.
This method is quick and easy and works well if you just need to crop a picture into a circle. But, when you need to change the picture, you need to insert the new picture into your slide and crop it again.
Method 2: Using the Shape Intersect Tool
Step 1: Insert the Picture
Insert the picture you want to crop into your PowerPoint slide.
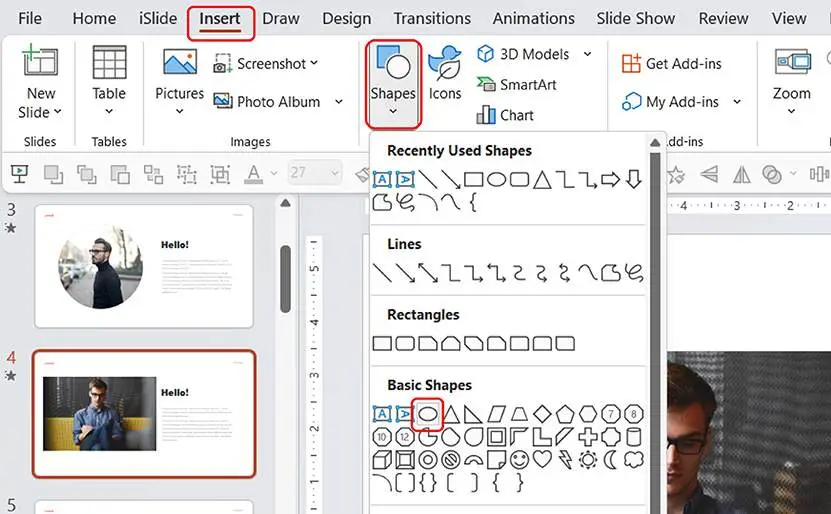
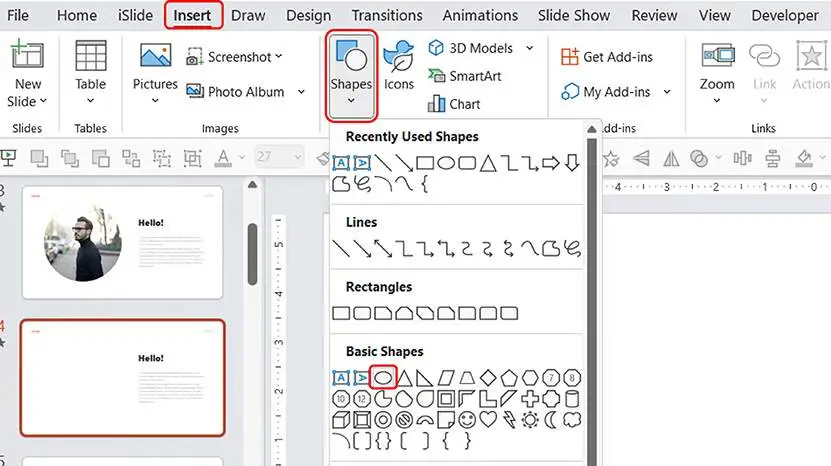
Step 2: Draw a Circle
Click on the “Insert” tab in the ribbon and select “Shapes“. From the Basic Shapes section, choose the oval shape. You can hold down the Shift key while clicking and dragging your mouse to draw a circle. If you don’t hold down the Shift key, you will get an oval.
Step 3: Place the Circle Over the Picture
Move the circle shape over the picture and resize it so that it covers the part of the image you want to crop into a circle. Make sure the circle is centered on the part of the picture you want to crop.
Tips: When you drag the corner of the circle to resize it, you also need to hold down the Shift key to keep it a circle. Otherwise, you will change it to an oval.

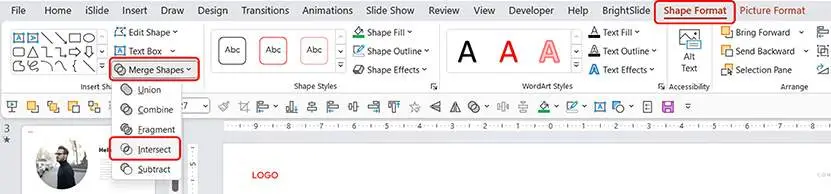
Step 4: Intersect the picture with the circle
Before cropping the picture, you should first select the image and then select the circle. Then, you should go to the “Shape Format” tab in the ribbon and click on “Merge Shapes“. In the dropdown menu, select “Intersect“. The circle shape will now cut out a circle from the picture.
Step 5: Adjust the size and position of this picture and save your presentation.
This method is easy. It allows you to crop your picture into a circle or any other shape. But it’s not very easy to change the picture.
Method 3: Fill a circle with a picture.
Step 1: Draw a Circle
Click on the “Insert” tab in the ribbon and select “Shapes“. From the Basic Shapes section, choose the oval shape. Draw a circle on the slide by holding down the Shift key while clicking and dragging your mouse until the shape is the desired size.
Step 2: Adjust the size and position of the circle.

Step 3: Fill the circle with your picture directly.
If your image is square, you can fill the circle with your image directly. If not, you’ll need to crop your image to a square and then fill it into a circle. Otherwise, your picture will be stretched.
When you select the circle, the “Shape Format” tab will appear. Click on this tab, and then click the “Shape Fill” option. Then, you should click the “Picture” option.
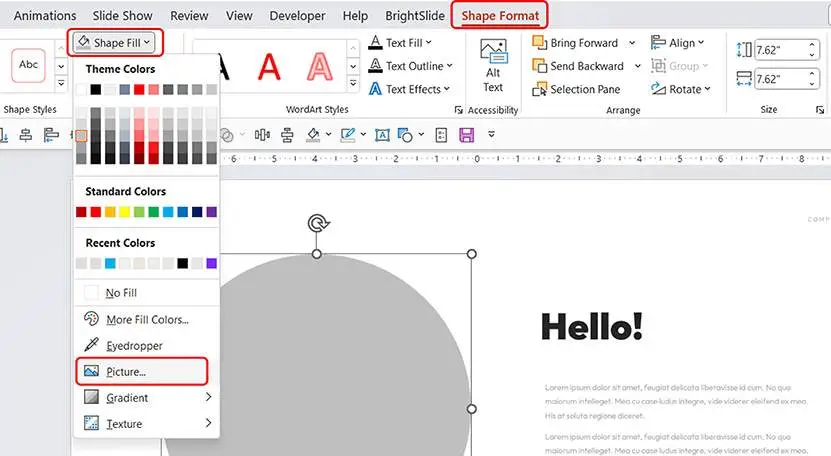
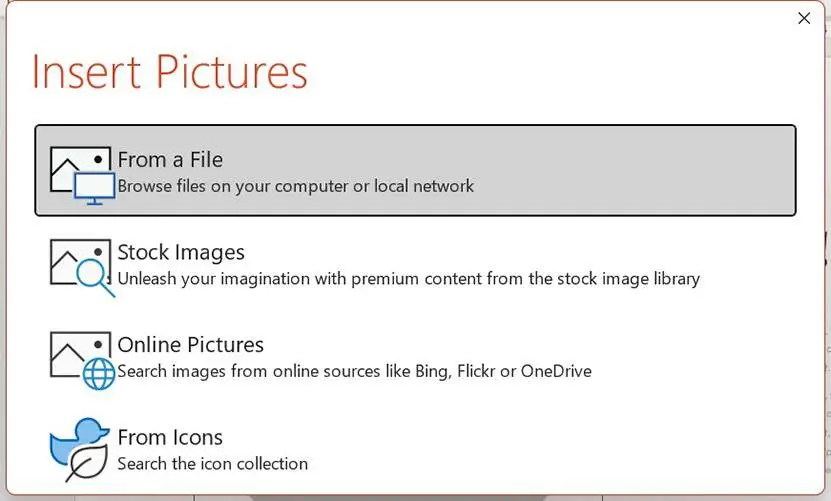
After you click the “Picture” option, a new window will appear. There are 4 options you can choose to insert a picture. You can use these options to insert the picture you want to use into the circle.
If the picture you want to use is not square. You should skip this step.
Step 4: Insert the picture and crop it to a square
Click on the “Insert” tab in the ribbon and select “Pictures“. Then, select the picture you want to use and insert it into your slide.
When you select the picture, the “Picture Format” tab will appear. Click on this tab, and then click the down arrow under the “Corp” option. Then, you should click “Aspect Ratio” and the option “1:1”. Now, you crop the picture into a square.
Step 5: Fill the cropped picture into the circle
After cropping the picture, you should copy this picture first. You can use the shortcut Ctrl + C to copy it quickly.
Then, select the circle. When you select the circle, the “Shape Format” tab will appear. Click on this tab, and then Click the arrow in the lower-right corner of the Shape Styles section.

Then, a task pane called “Shape Format” will appear on the right side of the slide.
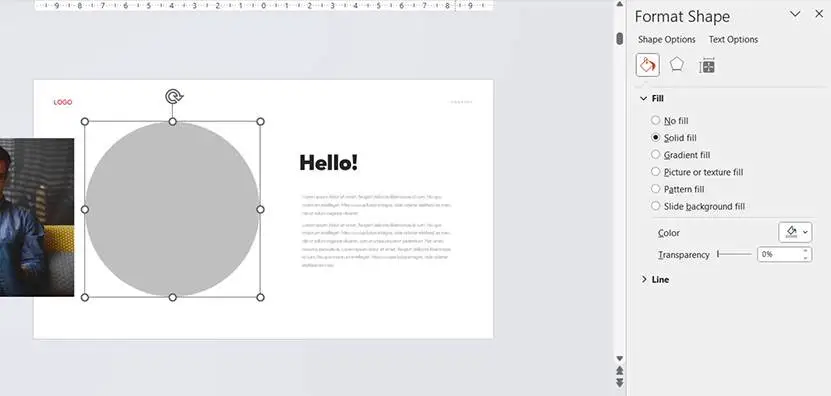
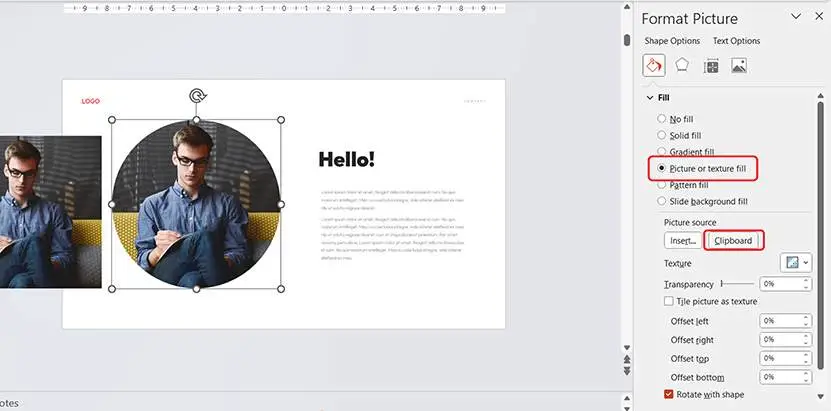
Select the “picture or texture Fill” option under the “Fill” section. Then, click the “Clipboard” option in the “Picture source” section. You will now fill the picture into the circle.
This method is a bit more complicated. But you can create a circle first even if you have no picture for this slide. It also allows you to crop the picture first and then fill it into a circle shape. It’s useful if you want to use a specific part of the image. You can also use this method to crop a picture into any other shapes.
Method 4: Using an Image Placeholder
Step 1: Create a new layout
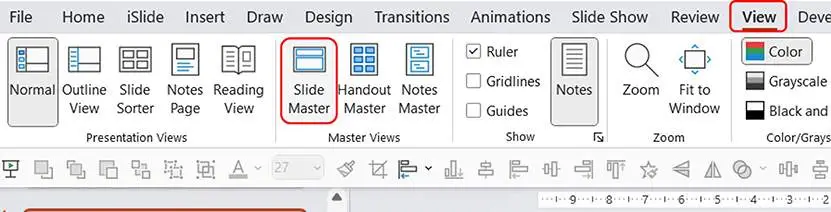
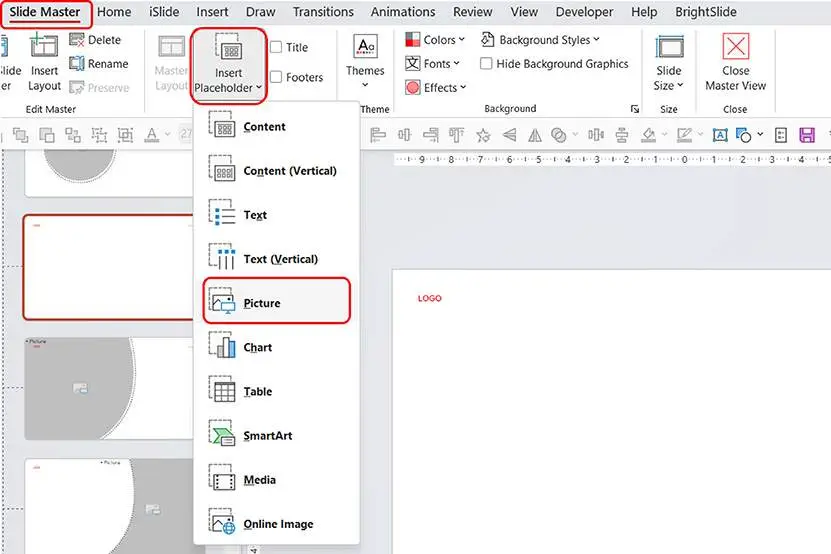
Click the “View” tab, and then click the “Slide Master” option. You will open the Master View of your presentation.
Now, you can create a new layout in Master View.
Step 2: Insert a Picture Placeholder
Click on the “Insert Placeholder” option, and then click the “Picture” option. Then, you can click and drag your mouse to create a picture placeholder. Because you need to make the picture placeholder square, you need to hold down the Shift key when you click and drag your mouse.
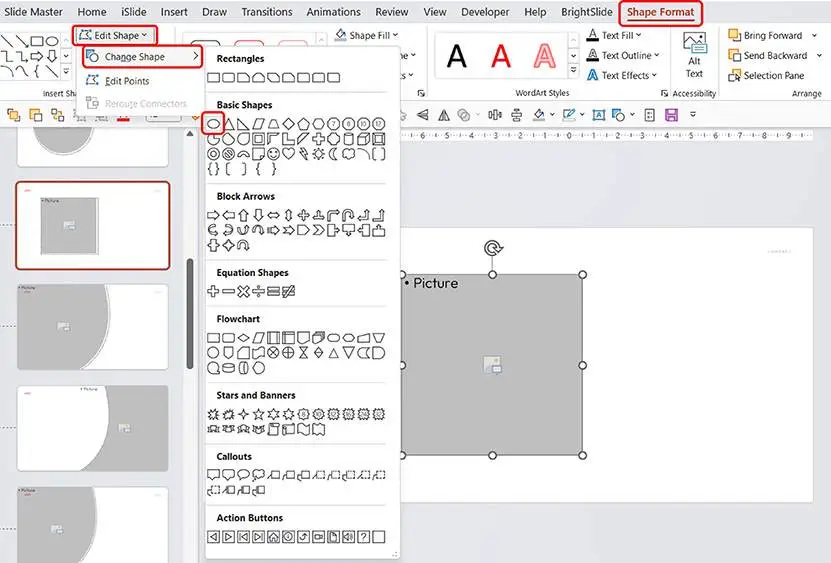
Step 3: Change the picture placeholder to a circle.
Before changing the picture placeholder, you should choose it.
When you select the picture placeholder, the “Shape Format” tab will appear. Click on this tab, and then click the “Edit Shape” option. Then, you should click “Change Shape” and choose the oval shape. Now, you will change the picture placeholder to a circle.
You can adjust the size and position of the picture placeholder as you want.
Step 4: Apply the layout to your slide.
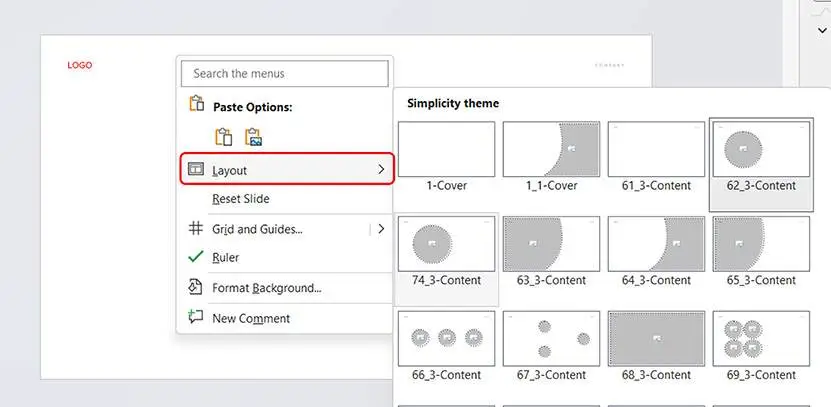
After creating the layout, you can close the Master View. Click the “Slide Master” tab, and then click the “Close Master View” option.

Right-click on the slide you want to use the layout, and then click the “Layout” option. Then, you can select the layout you created in the previous step.
Step 5: Insert your picture.
You can click the icon in the picture placeholder and select the picture you want to use. Or you can drag and drop your picture into this slide to insert your picture quickly.
Creating picture placeholders is complicated. But it’s very easy to insert a picture into the circle picture placeholder. You can also use this method to crop pictures into any other shapes. Another benefit of this method is that changing pictures is very easy. You just need to delete the original picture and drag the new picture into this slide. It’s very useful if you need to change the picture a lot.
Conclusion: 4 Best Methods to Crop a Picture into a Circle in PowerPoint
Cropping a picture into a circle shape is a simple and effective way to add visual interest to your PowerPoint presentations. With just a few clicks, you can create a unique design that will make your slides stand out. By following the methods outlined above, you can easily crop your pictures into circles in PowerPoint. So, you can create engaging presentations that capture your audience’s attention.